Getting Started
This chapter is dedicated to getting set up with all the software you will need to follow along with the course and complete the assignments. The first assignment of the module will have you complete this section. In this chapter, the following will be covered:
- Downloading and installing Julia via
juliaup1 - Installing Visual Studio Code
- Installing Git and GitHub desktop
- Creating a GitHub account
- Using GitHub classroom
Installing Julia
There are a few ways to install Julia. It is recommended to use the latest version of Julia, as there are frequent updates and improvements which are most likely non-breaking. Usually, it is safe to update to the most recent version without breaking your existing code. For this reason, we recommend using the juliaup1 tool to download and manage which Julia version is installed on your machine. Visit the juliaup GitHub page and follow the instructions in the README to install this on your system.
Once installed, run open a terminal2 and type
juliaup add ltsThis adds the most recent channel.
We also want to make this the default Julia installation, which can be done by running the command
juliaup default ltsOnce this is done, you should be able to type julia into your terminal and launch the REPL, showing the most recent version. At the time of writing the version of Julia used is Julia v.1.10.7 (Jan 8, 2024).
Installing Visual Studio Code
Visual Studio Code (or VS Code) is a lightweight Integrated Development Environment (IDE), which helps you write code. It supports a comprehensive development experience for almost any programming language. It is currently the most supported editor by the Julia developers.
Head to the download link3 below and follow the instructions to download it for your platform. Visit the documentation for the VS Code Julia extension4. Follow the instructions to download the official Julia extension.

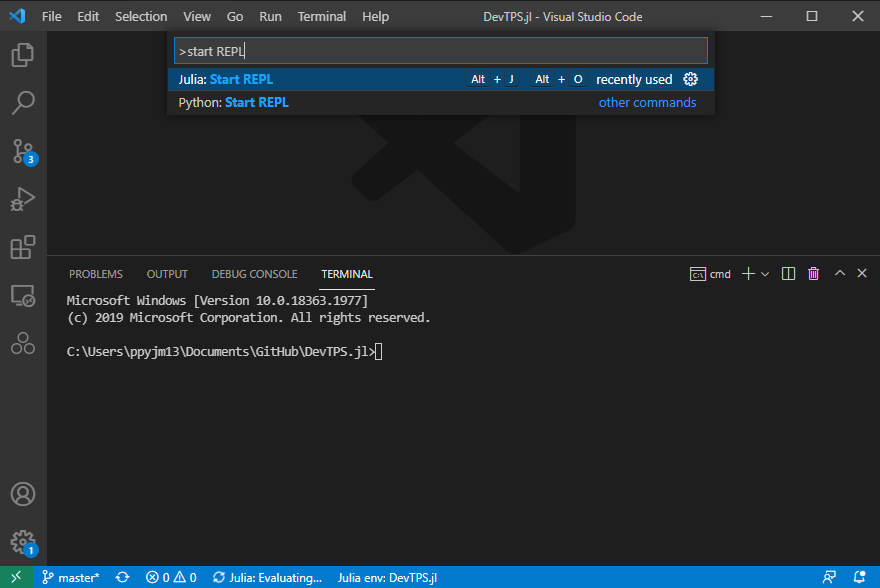
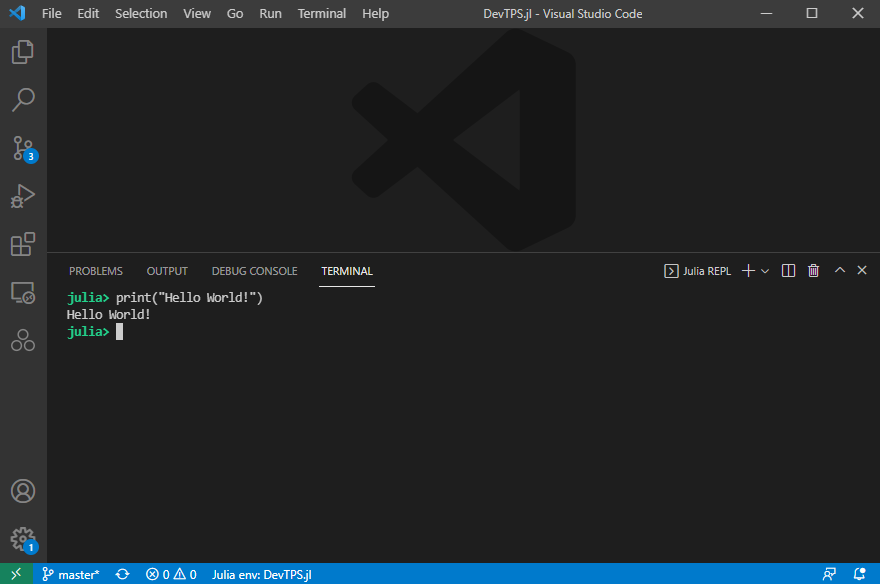
Ctrl+Shift+P.You can start the Julia REPL (this stands for Read Evaluate Print Loop) by pressing Ctrl+Shift+P to open the command palette and start typing in Start REPL and then select the option to start the Julia REPL.

The reason that we want to use the integrated REPL is so that plot viewer and other tools in Visual Studio Code can communicate with Julia. You can use any terminal to run your Julia code, but this makes the development experience a bit easier.
Installing Git and GitHub Desktop
In order to complete the assignments, you will need to use Git. No advanced Git skills are required for this course, but it is highly recommended that you learn the basics as this is an essential skill for any programmer. This module does not require and actively discourages the use of Git via the command line. It is recommended to use a Git GUI client (there are many to choose from) to interact with Git. This section chooses GitHub Desktop, as this is one of the easiest Git clients to use and is available for both Windows and MacOS.
GitHub Desktop
GitHub Desktop is what is known as a “Git Client”. Git is the underlying software that tracks changes in your code. It works by looking at all the files in folder on your computer and seeing if there are any changes. A repository is just a folder for your project, which is tracked by the Git software. GitHub desktop gives you a user-friendly way to interact with Git, instead of the user having to learn the command line tools. Head to the GitHub desktop website5 to download GitHub desktop for your specified platform. Install the software and create a GitHub account and login here.
Git
Installing the Git tool separately is a good idea since it can integrate with all of your software tools. Most importantly, this allows you to use some source control features inside VS Code. Head to the Git download page6 to install Git on your platform. Note that Linux users should use their built-in package managers, and MacOS users are advised to install the brew7 package manager and use that to install git.
Creating a GitHub Account
GitHub will be used to store a copy of your code on the cloud, acting like a backup and as a “source of truth” for the proper version of your code. This will act as a “remote” for your repository. You will also hear the GitHub version of your repository called the “origin”. You want to keep the GitHub version of your code and your local version as close as possible, make sure to use the “fetch” and “sync” buttons in the Git client as frequently as possible.
Follow the instructions to create an account or use your old one. You will need this to login to the GitHub desktop client. This allows you to clone your private repositories to your own machine. Note that you can also login to your GitHub account through VS Code and directly clone a repository through the VS code client.
Using GitHub Classroom
We are going to use GitHub classroom to assign workshops and projects to each student. Every student will have their own separate repository for each assignment. This will be hosted under our organisation, and not privately on your account. If you want to keep a copy of this code after you graduate, make a local copy. We would prefer if you not make any code from this module public, for academic integrity purposes.
You will need a GitHub account to use GitHub classroom. Make sure you are logged in on your browser and copy the assessment URL in a format like https://classroom.github.com/a/XXXXXX. Accept the assignment and find your name in the Moodle list, so we know whose GitHub accounts is whose. The repository will be created in the organisation page which will be linked in the Moodle page. Search for your username to find the repositories that you have access to. Clone this repository to your local machine to get access to the code locally. Once you have made changes, make sure to commit your changes and push these changes back up to GitHub.
Getting Help with Git
This module will not focus on the specifics of Git, and we highly recommend that you make use of Google to find answers to specific questions. During this course, the Git skills that are required are:
- Cloning a Git repository to your local machine
- Making local changes to your code, staging and committing them locally
- Pushing your commits to the cloud8
- Pulling changes from the cloud to your local machine
- (Optional) Working in a separate branch and making Pull Requests to merge your code into the main branch
Use these keywords to help your Google searches.
Footnotes
- https://github.com/JuliaLang/juliaup↩
- On Windows, you can use either Powershell or Command Prompt, which can be searched in the Start Menu. On Mac, find a guide online on how to open a terminal if you do not know.↩
- https://code.visualstudio.com/↩
- https://code.visualstudio.com/docs/languages/julia↩
- https://desktop.github.com/↩
- https://git-scm.com/downloads↩
- https://brew.sh/↩
- Sometimes called the origin. This is where the code is hosted and backed up on GitHub.↩